> ## Documentation Index
> Fetch the complete documentation index at: https://docs.taxibutler.com/llms.txt
> Use this file to discover all available pages before exploring further.
# Assembling the Desktop KIOSK
> Learn how to convert & assemble the Desktop version of the Taxi Butler KIOSK.
## Prerequisites
* You must have the Floor Stand version with you
* You must have a Desktop Base Plate (ordered separately)
If the Screen is already mounted to the Screen Stand, you're ready to go. If it isn't, you'll attach it during step 4 of "Assembling the screen to the desktop stand" below, which will direct you to the floor-standing guide.
## Preparing parts from the Floor Stand box
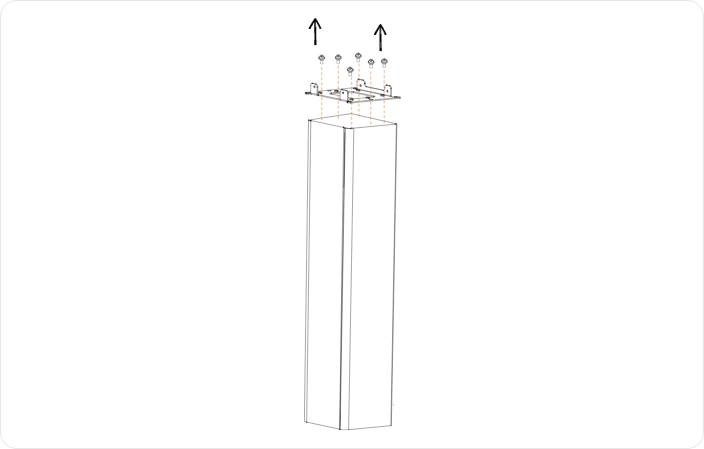 1. **Unscrew the 6x Black M4 screws** that attach the Connection Plate to the top of the Floor Stand.
2. Set the Connection Plate and screws aside.
1. **Unscrew the 6x Black M4 screws** that attach the Connection Plate to the top of the Floor Stand.
2. Set the Connection Plate and screws aside.
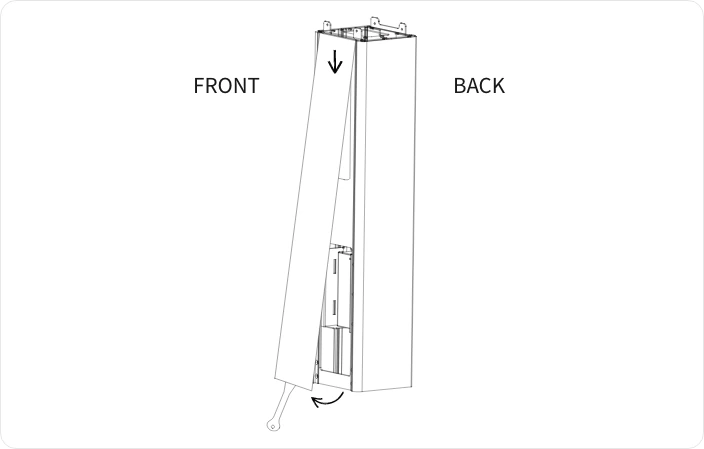 1. **Use the Pry Tool provided to gently pry open the acrylic panel** on the front of the Floor Stand. Insert the tool into the gap at the bottom of the panel and lift away the bottom part of the panel. Pull down on the top part of the panel to remove it. This exposes the Power Adapter.
2. **Unscrew the 2 screws** from the metal bracket holding the Power Adapter in place.
3. **Remove the Power Adapter** and set it aside.
## Assembling the desktop stand
The stand is made up of three parts:
1. Desktop Base Plate
2. Connection Plate
3. Screen Stand (houses the printer and where the screen attaches).
1. **Use the Pry Tool provided to gently pry open the acrylic panel** on the front of the Floor Stand. Insert the tool into the gap at the bottom of the panel and lift away the bottom part of the panel. Pull down on the top part of the panel to remove it. This exposes the Power Adapter.
2. **Unscrew the 2 screws** from the metal bracket holding the Power Adapter in place.
3. **Remove the Power Adapter** and set it aside.
## Assembling the desktop stand
The stand is made up of three parts:
1. Desktop Base Plate
2. Connection Plate
3. Screen Stand (houses the printer and where the screen attaches).
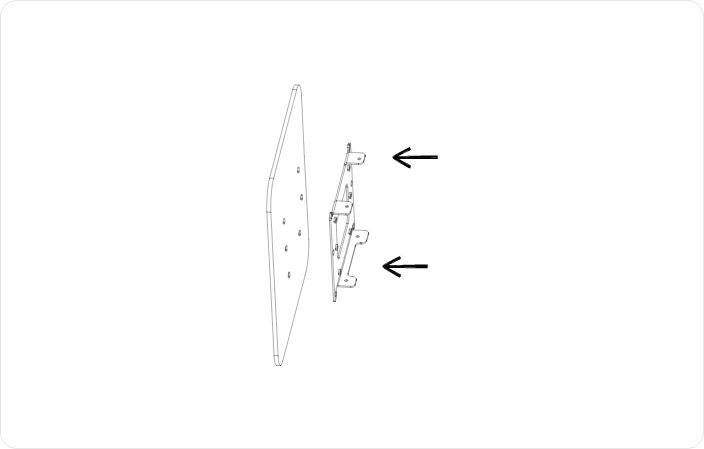 **Place the Desktop Base Plate on one of its short sides**, standing up, and align the Connection Plate on the top side (opposite side of the countersunk screw holes).
The Desktop Base Plate has a top and bottom side. The bottom side is the one with the countersunk screw holes.
**Place the Desktop Base Plate on one of its short sides**, standing up, and align the Connection Plate on the top side (opposite side of the countersunk screw holes).
The Desktop Base Plate has a top and bottom side. The bottom side is the one with the countersunk screw holes.
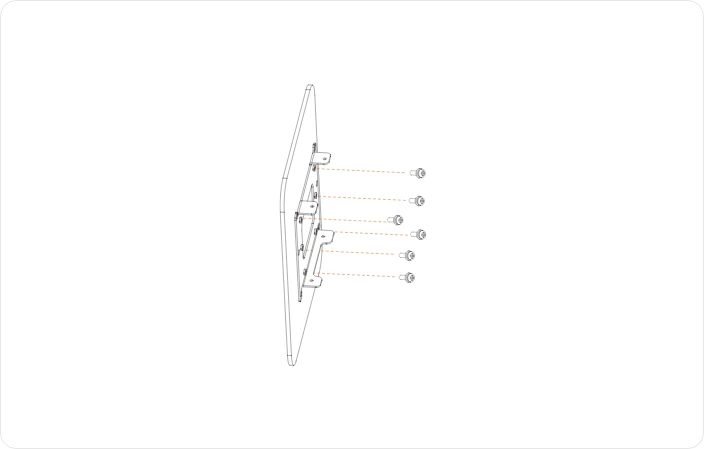 **Secure the Connection Plate to the Desktop Base Plate using the 6x Black M4 screws** that you set aside in step 1.2 of "Preparing parts from the Floor Stand box".
**Insert the screws from the bottom** of the Desktop Base Plate.
**Secure the Connection Plate to the Desktop Base Plate using the 6x Black M4 screws** that you set aside in step 1.2 of "Preparing parts from the Floor Stand box".
**Insert the screws from the bottom** of the Desktop Base Plate.
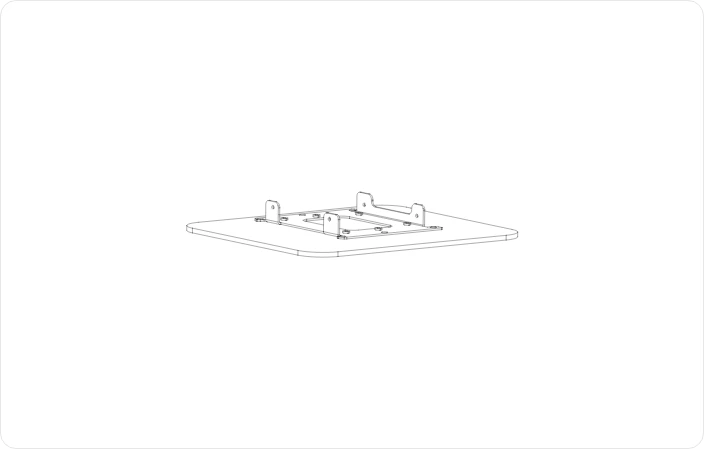 Place the assembled desktop stand top-side up.
## Assembling the screen to the desktop stand
Place the assembled desktop stand top-side up.
## Assembling the screen to the desktop stand
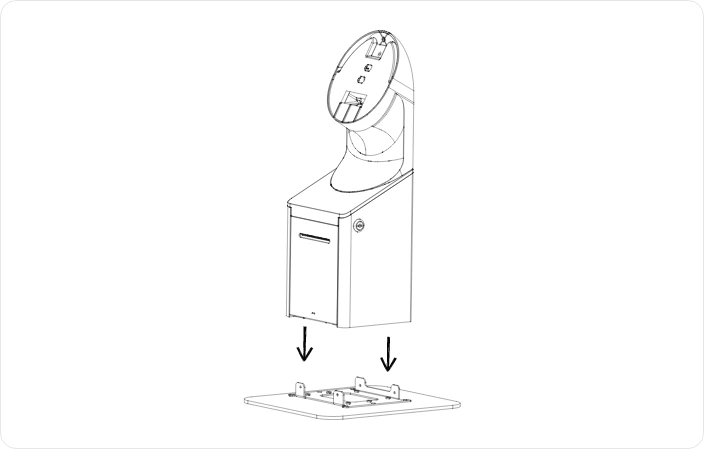 **Align and slide the Screen Stand onto the Connection Plate**, aligning the brackets.
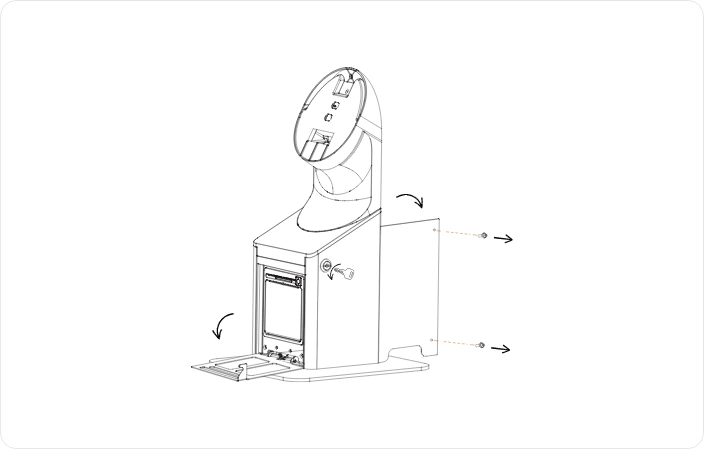 1. On the Screen Stand, **use one of the Printer Housing Keys to open the front panel** (where the printer is housed)
2. **Open the back panel by unscrewing the 2 screws** on the right side. Put these 2 screws to one-side, they will be used again later. This exposes 2 holes at the front and 2 at the back for mounting the Screen Stand to the Connection Plate.
1. On the Screen Stand, **use one of the Printer Housing Keys to open the front panel** (where the printer is housed)
2. **Open the back panel by unscrewing the 2 screws** on the right side. Put these 2 screws to one-side, they will be used again later. This exposes 2 holes at the front and 2 at the back for mounting the Screen Stand to the Connection Plate.
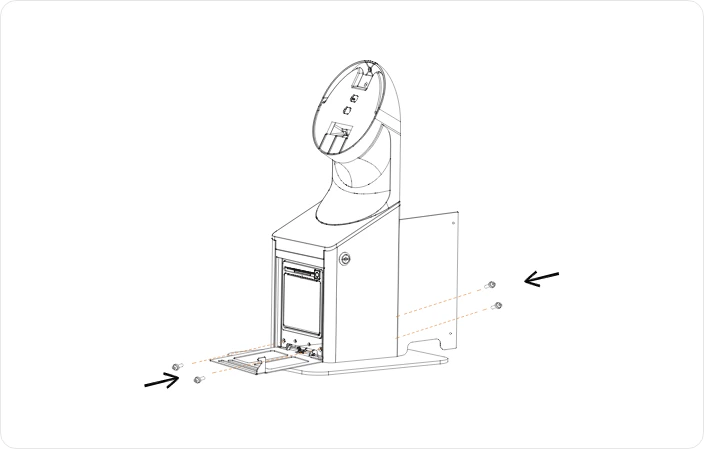 **Secure the Screen Stand to the Connection Plate using 4x Black M4 screws.**
**Insert 2 screws at the back and 2 screws at the front** (accessible through the open printer housing cover).
If your Screen isn't mounted to the Screen Stand yet, follow steps 1-2 in "Assembling the screen to the stand" from [the floor-standing guide](https://docs.taxibutler.com/fleets/kiosk/assembling-the-kiosk-floorstand#assembling-the-screen-to-the-stand).
**Secure the Screen Stand to the Connection Plate using 4x Black M4 screws.**
**Insert 2 screws at the back and 2 screws at the front** (accessible through the open printer housing cover).
If your Screen isn't mounted to the Screen Stand yet, follow steps 1-2 in "Assembling the screen to the stand" from [the floor-standing guide](https://docs.taxibutler.com/fleets/kiosk/assembling-the-kiosk-floorstand#assembling-the-screen-to-the-stand).
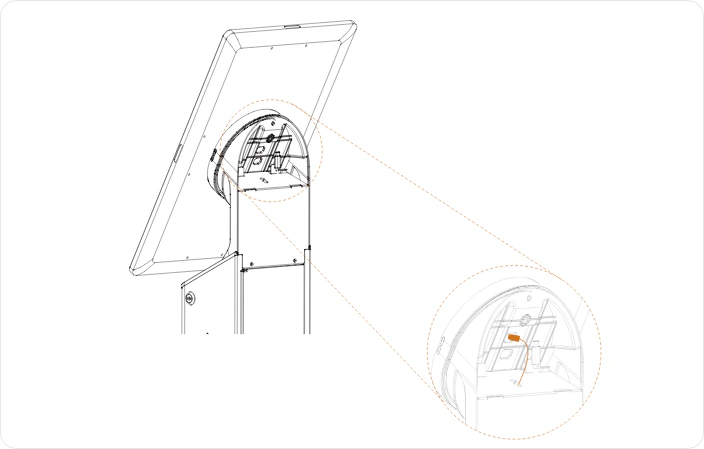 Remove the Screen Stand Back Plate if it isn't already off.
**Plug in the USB-C power cable** from the Screen Stand into the connector in the back of the Screen, using the provided hole.
Remove the Screen Stand Back Plate if it isn't already off.
**Plug in the USB-C power cable** from the Screen Stand into the connector in the back of the Screen, using the provided hole.
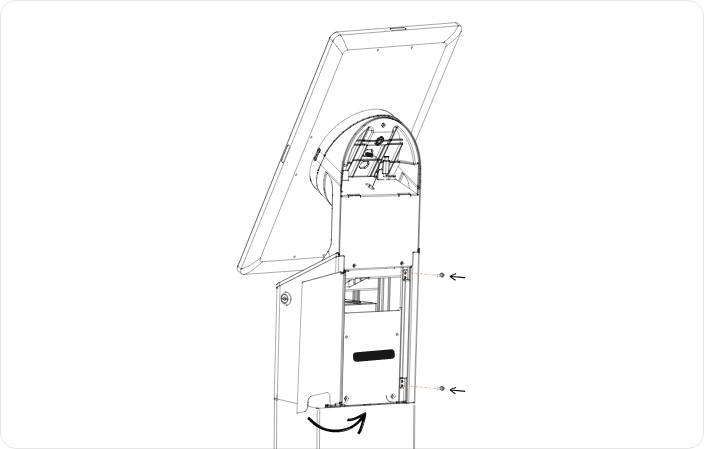 1. **Close and lock the printer housing cover** using the Printer Housing Key.
2. **Close the back panel** and secure with the 2 screws you removed in step 2.
1. **Close and lock the printer housing cover** using the Printer Housing Key.
2. **Close the back panel** and secure with the 2 screws you removed in step 2.
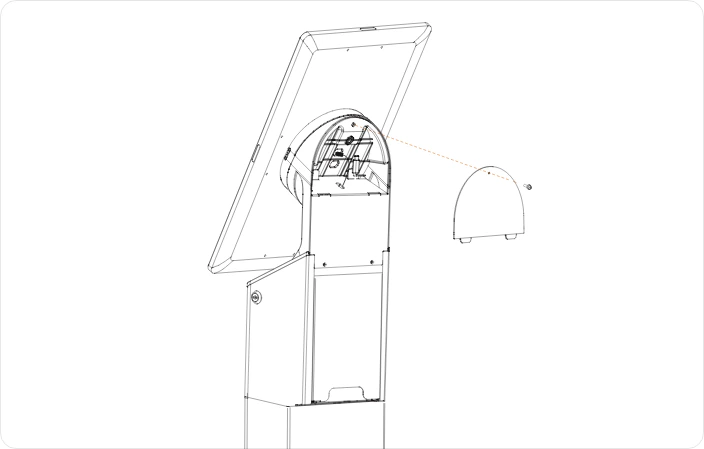 **Fit the Screen Stand Back Plate** by slotting the two notches at the bottom into their respective slits, then secure at the top using the M3 screw that is already screwed into the Screen Stand Back Plate.
## Powering on the device
**Plug the power cable** into the Power Adapter that you removed from the Floor Stand and plug the other end into a mains power outlet.
**Position the Power Adapter securely** on the desk or surface where the device is placed.
For the desktop version, the Power Adapter sits outside the housing.
**Find and press the Power button** on the lower right back side of the Screen.
**Fit the Screen Stand Back Plate** by slotting the two notches at the bottom into their respective slits, then secure at the top using the M3 screw that is already screwed into the Screen Stand Back Plate.
## Powering on the device
**Plug the power cable** into the Power Adapter that you removed from the Floor Stand and plug the other end into a mains power outlet.
**Position the Power Adapter securely** on the desk or surface where the device is placed.
For the desktop version, the Power Adapter sits outside the housing.
**Find and press the Power button** on the lower right back side of the Screen.